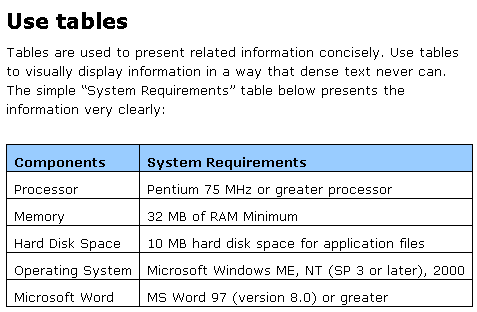
In many cases, it is necessary to use a table to clarify complex lists of information. With Doc-To-Help, you can use Words table feature to include formatted tables in your documentation. In this section, you will format existing text as a table and include it in your project.
1. Right-click the StyleGuide.doc and select Open from the shortcut menu.
2. Scroll down the document until you locate the "Use tables" section.
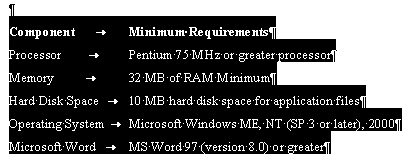
3. Highlight the tab-separated text.
4. Select Table | Convert | Text to Table. The Convert Text to Table dialog box opens.
5. Select the AutoFit to contents option from the dialog box.
6. Select Separate Text at Tabs.
7. Click OK.
8. Highlight the top row of the new table.
![]()
9. Select Format | Borders and Shading.
10. Select the Shading tab and change the Fill to pale blue.
11. Click OK.
12. Save and close the StyleGuide document.
13. Click the Make Target button.
14. Click the View Target button.
15. View the table. Note that the colored table header was carried into your help file.
Note: Table formatting is not available in WinHelp. Although the WinHelp compiler supports Word tables, it does not support table borders or shaded cell backgrounds. For more information on adding custom tables to a WinHelp file, see Inserting Objects to Create Special Effects in Word Documents.
16. When youre finished, close the Help file.
For more information on inserting and formatting standard tables, see Inserting Standard Tables with Doc-To-Help.