One of the nice things about using powerful HTML editors such as Microsoft FrontPage or Dreamweaver is all the formatting abilities these editors offer. You can easily create bulleted and numbered lists, change fonts and colors, add borders, spell-check your document, and so on. You can pretty much forget you are working on a help system and concentrate on the documents.
In addition to using regular in-line formatting, you can use cascading style sheets to define and use custom styles. Style sheets are great because they guarantee consistency and separate formatting from content. If you decide to change the way your document should look, just change the style sheet and rebuild the help system. You don't have to touch the content at all.
Getting back to our tour, let's create a style sheet with a couple of styles and use them to enhance the appearance of our content using Microsoft FrontPage (if you are using a different editor, the steps will be slightly different, but the main mechanisms will be the same).
1. Create a new text file and save it as ScubaStyles.css in the folder that contains all the tutorial content.
2. In the Doc-To-Help project editor, click the Project icon and select the Documents item from the left pane Tree View.
3. Double-click the Scuba Dive.htm document to open it in FrontPage or your default HTML editor.
4. In FrontPage, select the Format | Style Sheet Links menu option. The Link Style Sheet dialog box opens.
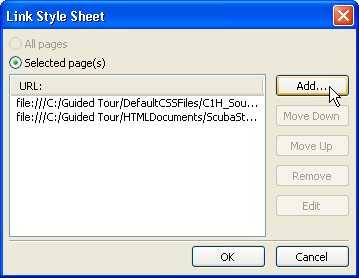
5. Click the Add button and use the Look in drop-down to locate the ScubaStyles.css file we created in step 1.
6. Select the file and click OK.
7. Repeat the last steps to add the new style sheet to the Learn to Dive and Equipment documents.
The new style sheet has been added to the documents. The HTML header in each file should now have a line that looks like this:
<link rel="stylesheet" type="text/css" href="ScubaStyles.css">
The documents look exactly the same, because the new style sheet is empty. You can now use FrontPage to add styles to the css file and to modify the appearance of the styles associated with HTML styles.
We will now create a new paragraph style called "Important" and modify the styles associated with the "UL" and "LI" Html tags to customize the appearance of bullet lists.
1. In FrontPage, select the Format | Style Sheet Links menu option again.
2. In the dialog box, select the ScubaStyles.css file and click Edit.
3. In the Style toolbar, click the
Style button ![]() .
In the Style dialog, click New to create the new style.
.
In the Style dialog, click New to create the new style.
4. Enter the new style name Important and use the Format button to customize the border, background color, and font for the new style (use any options you want for now). Click OK to close the New Style dialog box when you are finished.
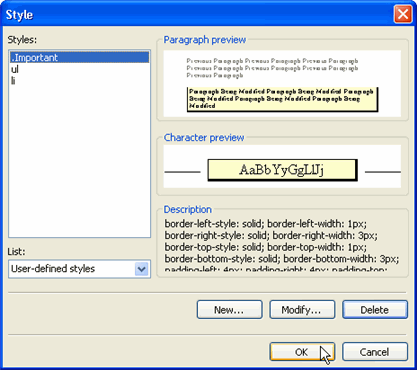
5. Back in the Style dialog box, select HTML Tags from the List drop-down.
6. Select the UL item (unordered list) from the list of styles and click Modify to customize the style. Repeat the process to customize the LI (list item) style.
7. Save and close the ScubaStyle.css file.
That's how you create and customize css styles. If you want to keep your document consistent with the tutorial, copy the ScubaStyles.css file from the tutorial folder into your working folder.
The styles associated with HTML tags are applied automatically. The custom style Important needs to be applied manually, by selecting a paragraph in FrontPage and picking the style from the style drop-down list. This was already done for you in the tutorial files, but feel free to highlight more items as Important if you want.
Before rebuilding the project to see the changes, let's also change the built-in theme.
1. In the Doc-To-Help project editor, click the Project icon and select the Help Targets item from the left pane Tree View.
2. Make sure the HTML Help target is selected in the right pane.
3. Click the Theme property in the Properties Pane. The Theme Preview window appears.
4. Select Nonscrolling from the Theme drop-down.
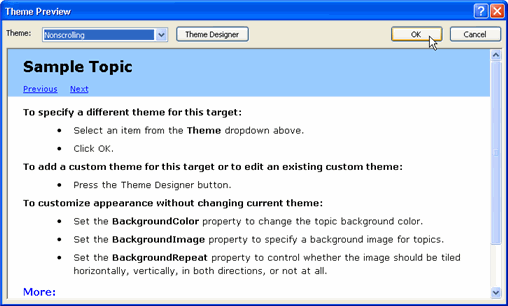
5. Click OK to close the Theme Preview window.
6. Build and view the target. The help file should now look like this:
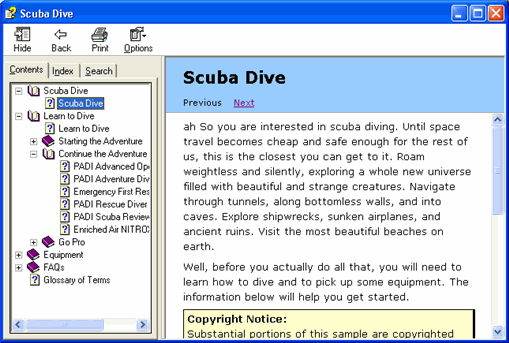
Notice the blue non-scrolling title that was defined by the new theme, and the highlighted information formatted with the Important style.
Navigate the help system to see the appearance of the bullet lists, which now have a background and a border.
Making help content look good is easy with Doc-to-Help (and a good HTML editor).
Note: Doc-to-Help doesn't know about the custom .css file, so it won't detect changes and automatically offer to re-build the help file. You may have to use the Rebuild Target button to force an update and see the changes.